
Binance Guides
Binance Deposit Not Credited or Withdrawal Not Received?
Troubleshoot a Binance deposit not credited or withdrawal not received by matching the network, address and memo, then checking TxID, confirmations, and status.
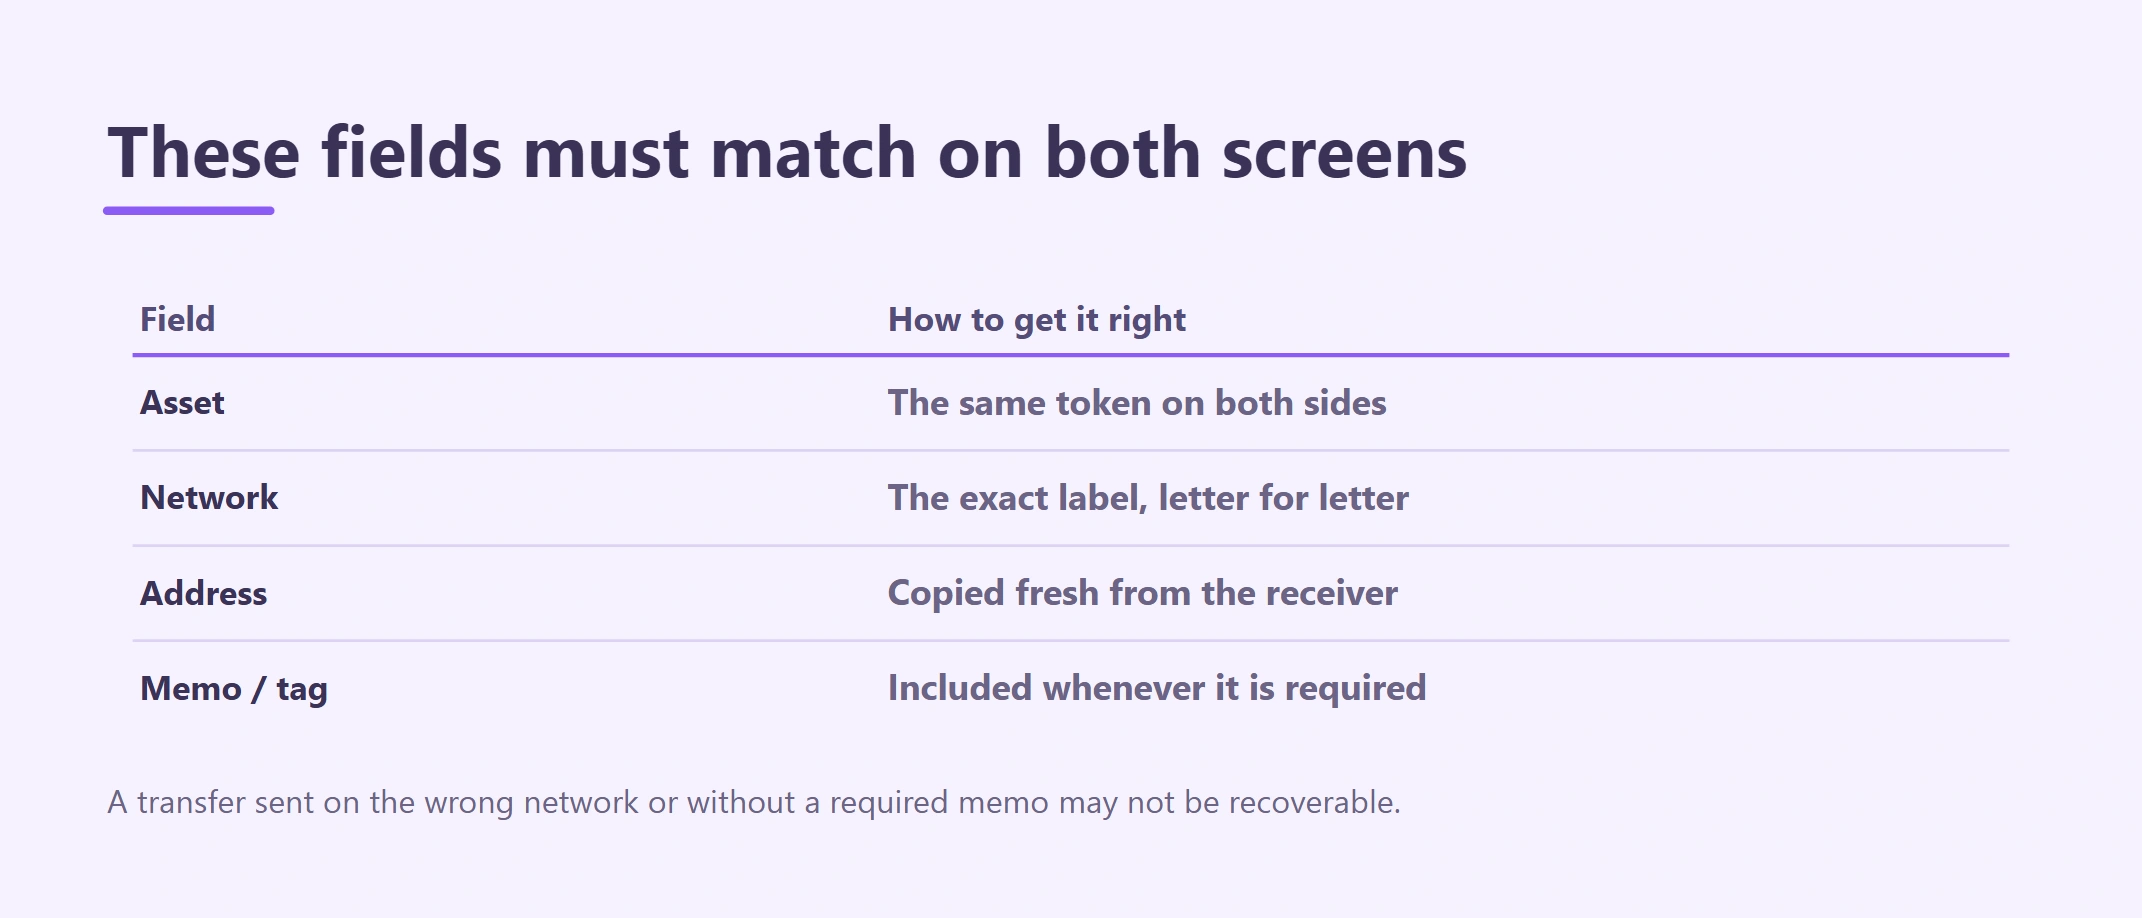
If you are troubleshooting a Binance deposit not credited or a withdrawal marked successful but not received, start with the receiving side. Match the asset, network, address, memo, minimum, TxID, and confirmation status before assuming the funds are lost. This guide covers Binance’s external crypto transfer flow and its failure branches. Official sources reviewed August 26, 2026.
A crypto deposit moves an asset from an external wallet or provider into a Binance-controlled address. A crypto withdrawal sends an asset from Binance to an external blockchain address. The most dangerous assumption is that the token name alone identifies the route. It does not: the asset, blockchain network, destination address and memo/tag must form one compatible set.
This article begins after registration, KYC and security setup. It stays inside Binance’s external crypto deposit and withdrawal flow, including route matching, status checks and exceptions.
What must match on both screens
| Field | Sender must know | Receiver must show |
|---|---|---|
| Asset | Exact coin or token being sent | Same supported asset, including the correct token contract where relevant |
| Network | Blockchain used to broadcast | Same deposit/receive network |
| Address | Fresh destination copied from receiver | Address generated for that asset and network |
| Memo, tag or payment ID | Included exactly when required | Secondary identifier and whether it is mandatory |
| Minimum | Amount leaving the sender | Minimum amount the receiver will credit |
| Fee and net amount | Platform/network deduction | Enough must arrive after deductions |
| Status | Withdrawal and TxID status | Confirmations and credited balance |
“USDT” or “USDC” by itself is incomplete payment information because the same asset may exist on several networks. Read crypto network fees and confirmations if this distinction is not yet clear.
The Binance screen is the final word on the route
The live Binance screen is the contract for this transfer. Record the fields that Binance exposes for the selected direction; an example from another account cannot replace them.
| What Binance shows | What to compare it against |
|---|---|
| Deposit or withdrawal direction | Which side is sending and which side must credit |
| Asset | Same coin or token at the external endpoint |
| Network | Exact supported blockchain label at both endpoints |
| Address and memo/tag | Fresh values from the receiving side |
| Minimum | Expected net receipt after deductions |
| Fee and amount received | External sender preview or Binance withdrawal preview |
| Status and TxID | Correct network explorer plus destination credit |
If Binance changes the address, memo requirement, network state, minimum or fee before authorization, reread the screen and recalculate. The earlier note no longer describes the transaction.
Deposit crypto to Binance: step by step
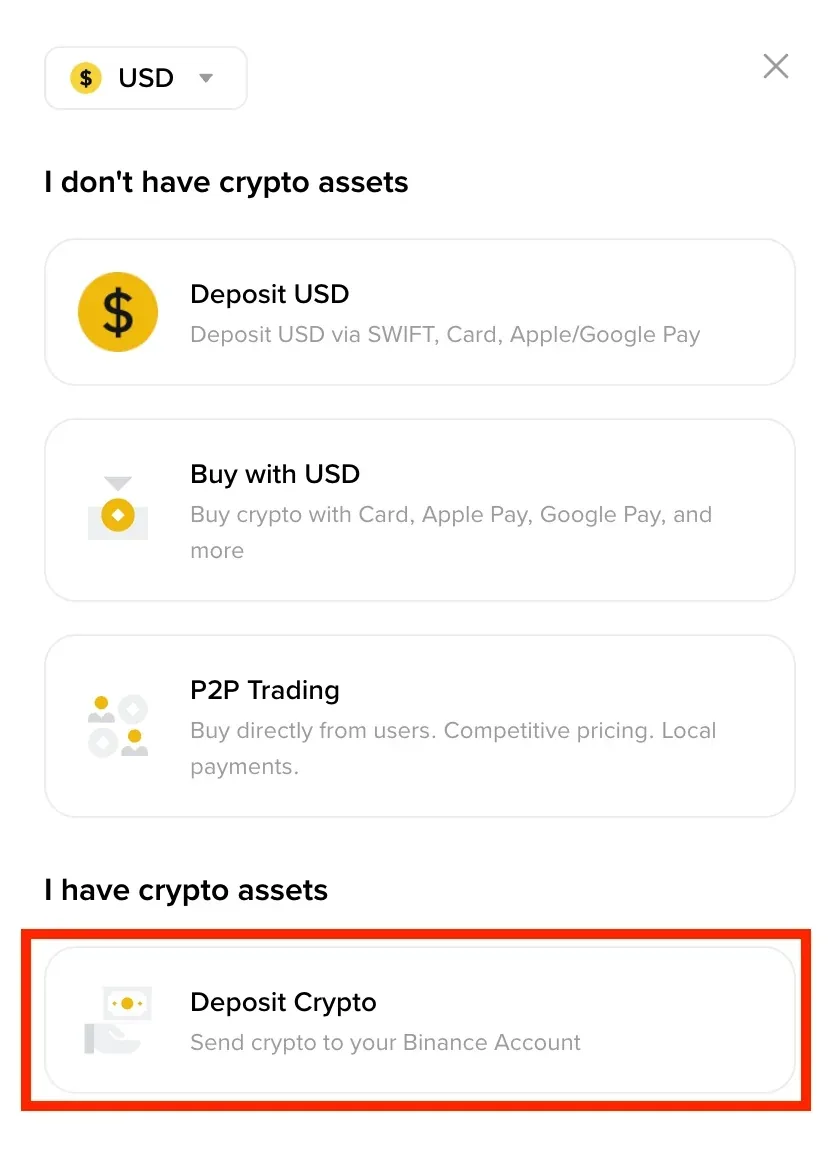
Binance Academy's public deposit-menu example, checked 2026-08-26. It identifies the crypto-deposit entry point; the available assets and networks come from your own live account.
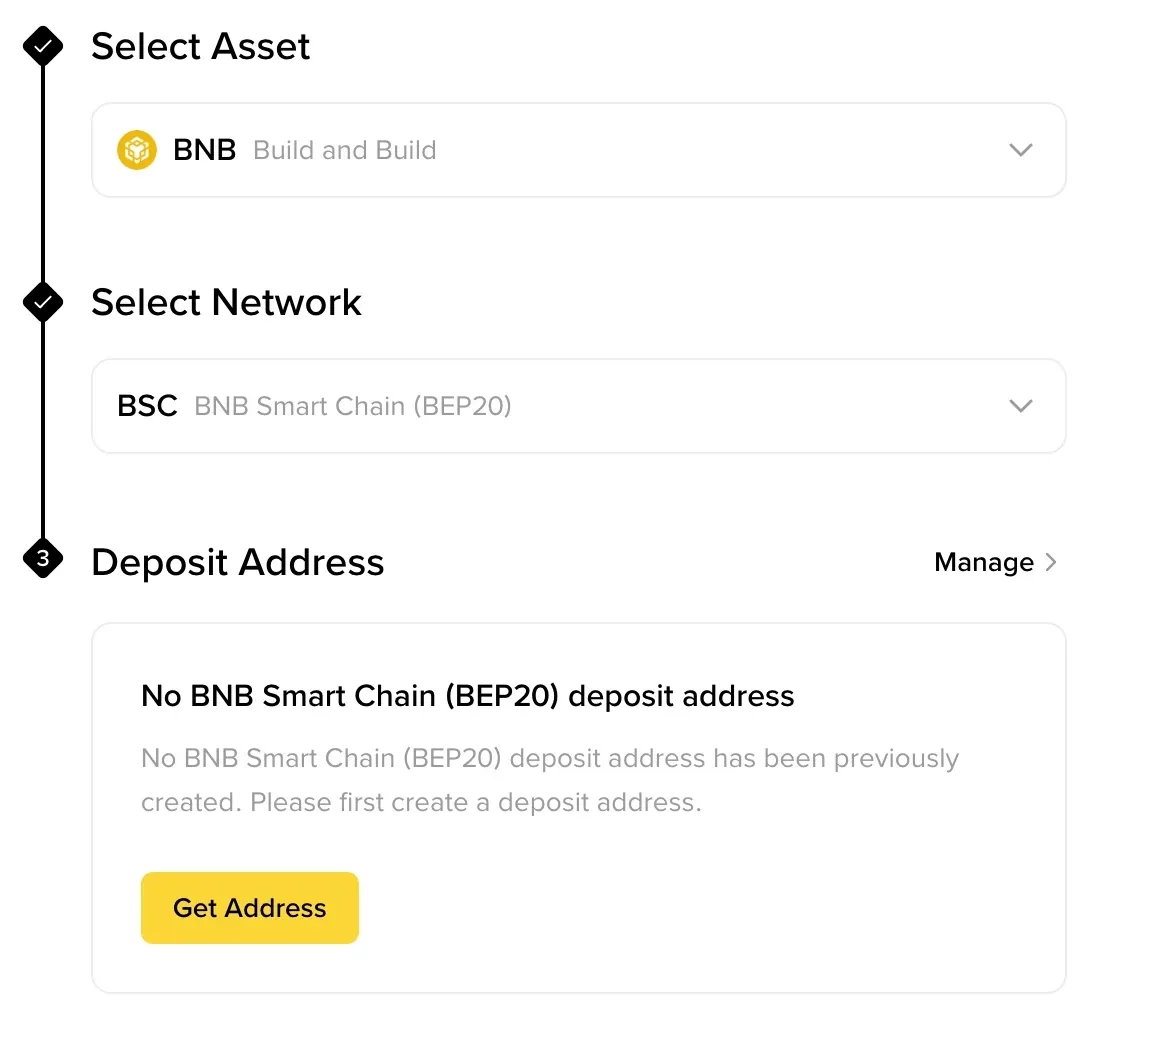
The official Binance Academy example, checked 2026-08-26, uses BNB and BSC only to demonstrate the fields. Select the asset and network required by your own live route; do not copy the example choice.
1. Secure the receiving account
Sign in through a trusted bookmark or the official app. Complete the securing a Binance account before funding. Stop if the account shows a restriction, security review or unexpected device.
2. Open the live crypto-deposit flow
Choose crypto deposit rather than card, bank or P2P funding. Select the exact asset. Do not assume a search result with the same ticker is the same contract or product.
3. Select the receiving network
The network shown by Binance must also be available in the sending wallet. If either side lacks the intended network, do not send. Never choose a cheaper network only because the address format looks similar.
4. Copy address and memo/tag together
Copy the newly displayed address. If Binance shows a memo, tag or payment ID, treat it as part of the destination. A shared exchange address without the required secondary identifier may reach the provider but fail to credit your account.
5. Read minimum and deposit status
Confirm the route is active and note the minimum deposit and required confirmations. A transfer below the minimum may not be credited. Do not rely on a value remembered from another day or article.
6. Configure the sender
On the external wallet or platform, select the same asset and network. Paste the address and memo/tag. Compare the first and last characters, then compare the full value on a second trusted display when the amount matters.
7. Send a small test first
The test must be above the displayed receiver minimum after considering deductions. Record the sender's withdrawal ID and blockchain TxID. Wait until Binance shows a credited balance—not merely a “successful” sender status—before sending more. Use the crypto test transaction guide to size and verify the test.
8. Reconfirm before the main amount
Reopen both screens. Confirm the account, asset, network, address, memo, fee and net amount again. If any field changed after the test, pause and understand why.
Withdraw crypto from Binance: step by step
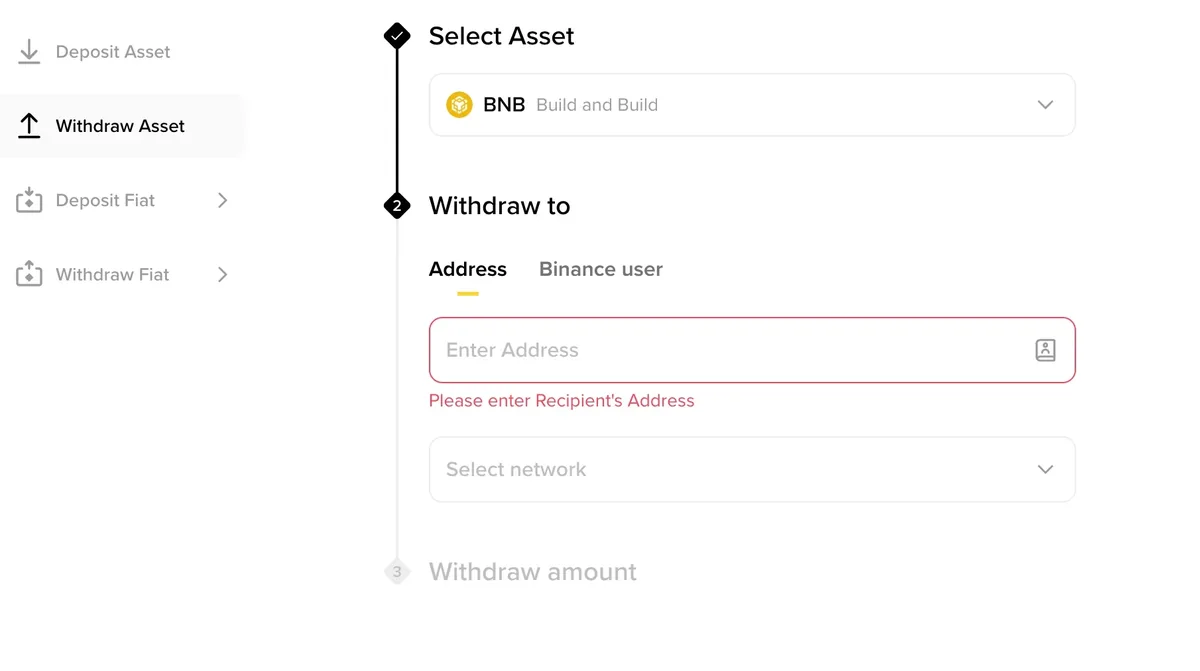
Official Binance Academy example, checked 2026-08-26. The address field is intentionally empty; obtain the destination address and supported network from the receiving platform in real time.
1. Start at the destination
Open a fresh receive/deposit screen in the destination wallet or provider. Choose its asset and network first. Copy its address and any memo/tag. Never begin from an old Binance withdrawal-history entry.
2. Open Binance withdrawal
Select the same asset. Paste the destination and choose the exact network supported by the receiver. If Binance suggests a network automatically, still compare it with the destination screen.
3. Verify the recipient
Confirm that you control the destination or that the named recipient supplied it through an authenticated channel. Beware of clipboard malware, address poisoning, urgent “support” messages and last-minute address changes.
4. Review amount, fee and amount received
The sender amount and recipient amount can differ:
Estimated amount received = withdrawal amount − displayed withdrawal fee
Check the live minimum, fee and preview. Make sure the resulting amount is above any minimum at the destination. Network fees and Binance withdrawal fees can change.
5. Complete security checks privately
Approve the withdrawal only inside the official account. Never send an OTP, password, passkey secret or authenticator recovery key to a caller or chat agent. Read every address and amount shown in the confirmation message rather than approving automatically.
6. Test, confirm, then continue
For a new route or material payment, send a small test. Wait for both the blockchain status and the destination's credited balance. Then reopen the live destination page before sending the remainder.
How to read transfer status
| Evidence | What it proves | What it does not prove |
|---|---|---|
| Binance deposit address displayed | Binance offered a route at that moment | The sender has selected the same network |
| Sender says Completed | The sending platform finished its process | Binance has credited the correct account |
| TxID appears in the correct explorer | A transaction exists on that blockchain | Required memo and provider crediting are correct |
| Confirmations increase | The network is processing/finalizing | The receiving platform's threshold is met |
| Binance balance credited | Deposit reached the account | It is safe to reuse the route forever |
| Withdrawal marked Processing | Binance accepted the request | It has been broadcast or received |
Use the explorer for the selected network, not an explorer with a similar token name. Never paste a seed phrase or private key into an explorer.
Binance deposit not credited: what to check
Stop additional transfers and collect: asset, network, full destination with sensitive parts masked for support, memo/tag, amount, TxID, confirmation count, minimum, sending-platform status and Binance deposit status.
| Cause to check | Evidence | Next action |
|---|---|---|
| Still confirming | Correct explorer and Binance confirmation requirement | Wait and monitor; do not resend |
| Below minimum | Live minimum versus net amount sent | Use official support; credit is not guaranteed |
| Missing/wrong memo | Destination instructions and transaction record | Use the receiving provider's official recovery/support flow |
| Unsupported or wrong network | TxID's chain versus Binance route | Stop; recovery may be impossible or chargeable |
| Token contract mismatch | Contract address and supported asset details | Contact official support with the contract and TxID |
| Deposit suspended | Dated account notice | Wait for the official status; do not try random networks |
Binance withdrawal successful but not received: what to check
First determine whether the withdrawal is Awaiting approval, Processing, broadcast with a TxID, Completed, Rejected or Cancelled. Do not submit a second withdrawal while the first state is unknown.
- No TxID yet: check Binance status, security review and official notices.
- TxID exists but confirmations are low: monitor the correct explorer.
- Confirmed on-chain but not credited: contact the receiving provider with TxID, network, amount and memo evidence.
- Address or network is wrong: stop. Blockchain transfers usually cannot be reversed; only the destination controller or an applicable recovery tool may help.
- Suspected account compromise: stop all transfers and follow the incident steps in the account-security guide.
Recovery is never guaranteed. Anyone asking for a seed phrase, remote access or an additional wallet payment to “unlock” the transfer is a scam warning. Review crypto scam red flags.
Confirm the Binance transfer is actually credited
For a deposit, completion means the correct blockchain transaction reached the Binance route and the intended Binance account shows the credited asset. For a withdrawal, it means Binance produced the correct TxID and the external destination credited the expected asset.
Keep the direction, asset, network, address, memo/tag, net amount, Binance reference, TxID, timestamps and final credited balance together. A sender-side “Completed” label alone is not enough. If a test was used, record it separately from the main amount so the invoice or transfer total still reconciles.
What to gather before you contact Binance support
Use the transfer direction to decide which party should investigate first.
Deposit to Binance not credited: keep the Binance deposit screen or route record, sending-provider reference, asset, network, address, memo/tag, gross and net amount, TxID, broadcast time, current confirmations and the Binance deposit-status screen.
Binance withdrawal completed but not received: keep the Binance withdrawal ID, status history, fee and net amount, asset, network, destination, memo/tag, TxID, broadcast time, current explorer result and the destination provider's deposit-status screen.
Mask account UID, email, phone, document numbers and unrelated balances in screenshots, but do not crop away the route fields or timestamps needed to investigate. Send the packet only through the official support channel. A useful opening question is: “Which exact credit condition remains unmet for this TxID?”
If the destination is a self-custody wallet and the correct explorer shows success at the intended address, the next check is the wallet's supported token contract and display—not a Binance crediting queue. If the destination is another provider, that receiving provider controls the final account credit.
Official sources
- Binance Academy: Your Guide to Binance Deposit/Withdrawal
- Binance Academy: How to Deposit on Binance
- Binance Academy: Recover Crypto Sent to the Wrong Network
- Binance Academy: Block Explorer
Educational information only. Binance routes, limits, fees, confirmations, security delays and recovery options can differ by account or region and can change.